Canned peach pie is a delightful dessert option that combines convenience and flavor in every bite. With its rich, fruity filling and buttery crust, this pie offers a quick solution for satisfying sweet cravings without compromising on taste.

Whether you’re hosting a dinner party or simply looking for a comforting treat, canned peach pie stands out as a versatile choice that can be prepared with minimal effort. Perfect for any occasion, it celebrates the timeless appeal of peaches while saving time in the kitchen.
Jump To
Why Choose Canned Peaches for Your Pie?
When it comes to making a delicious peach pie, canned peaches offer several benefits that make them an excellent choice. From convenience to affordability, they simplify the process while ensuring a satisfying result.
Convenience and Availability
Canned peaches are available year-round, making it easy to enjoy a peach pie regardless of the season. You don’t need to wait for fresh peaches to be in season or worry about their ripeness. Additionally, canned peaches are pre-sliced and ready to use, saving you time on peeling and cutting. This convenience is perfect for busy bakers or anyone looking for a quick dessert solution.
Consistent Quality and Sweetness
One of the biggest advantages of canned peaches is their consistent quality. Each can is packed with peaches harvested at their peak ripeness, ensuring uniform texture and flavor. Unlike fresh peaches, which can vary in sweetness and juiciness, canned peaches deliver reliable results every time. This consistency is key to creating a perfectly balanced pie.
Cost-Effective Option
Canned peaches are a budget-friendly alternative to fresh fruit. While fresh peaches can be pricey, especially when out of season, canned varieties offer a cost-effective solution. They allow you to create a delicious pie without breaking the bank, making them ideal for both everyday baking and special occasions.
By choosing canned peaches, you can simplify your pie-making process without sacrificing flavor or quality.
Essential Ingredients for a Perfect Canned Peach Pie
Creating a delicious canned peach pie starts with the right ingredients.

These ensure your pie has the perfect balance of sweetness, tartness, and a flaky, buttery crust.
Ingredients for the Filling
- Canned peaches: Use two 15-ounce cans of peaches in syrup or juice. Drain them, but save a bit of the syrup for extra flavor.
- Sugar: Granulated sugar sweetens the filling, enhancing the natural peach flavor.
- Cornstarch: Helps thicken the filling, ensuring it’s not too runny once baked.
- Lemon juice: Adds a touch of acidity to brighten the peach flavor.
- Cinnamon and nutmeg: Warm spices that elevate the sweetness and add depth.
- Vanilla extract: A splash of vanilla enhances the overall flavor profile.
- 1 egg
- 1 cup unsalted butter
- 1 teaspoon cinnamon
Ingredients for the Crust
- Pie crust dough: Use homemade or store-bought pie crust for the base and top layer. A double crust is ideal for this recipe.
- Butter: Dotting the filling with small pieces of butter adds richness to the pie.
- Egg wash: A mix of beaten egg and water or milk brushed over the crust creates a golden, glossy finish.
- Sugar for sprinkling: Optional, but a light sprinkling of sugar on the crust adds sparkle and a touch of crunch.
Optional Additions
- Brown sugar: Replace some granulated sugar with brown sugar for a deeper, caramel-like sweetness.
- Almond extract: A few drops complement the peaches beautifully for a unique twist.
- Crumb topping: Swap the top crust for a streusel made of butter, flour, and sugar for extra texture.
With these ingredients, your canned peach pie will be irresistibly delicious, perfect for any occasion!
Step-by-Step Guide to Making Canned Peach Pie
Making a canned peach pie is a straightforward process that delivers delightful results. Follow these steps to create a dessert that’s sure to impress.
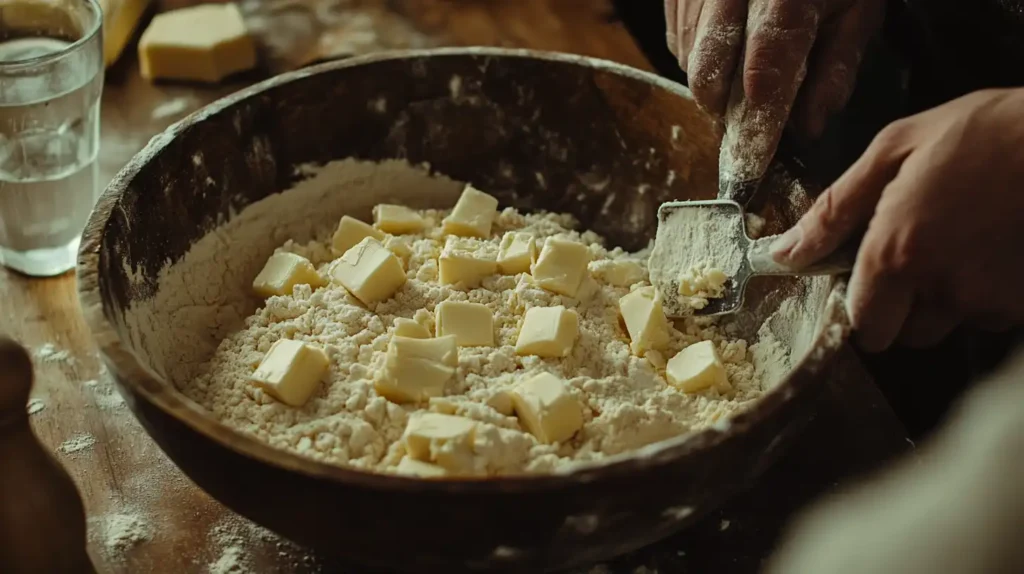
Step 1: Prepare the Pie Crust
Mix flour and salt in a bowl. Cut in chilled butter until crumbly, then add ice water gradually until dough forms. Divide, wrap, and chill for 30 minutes.
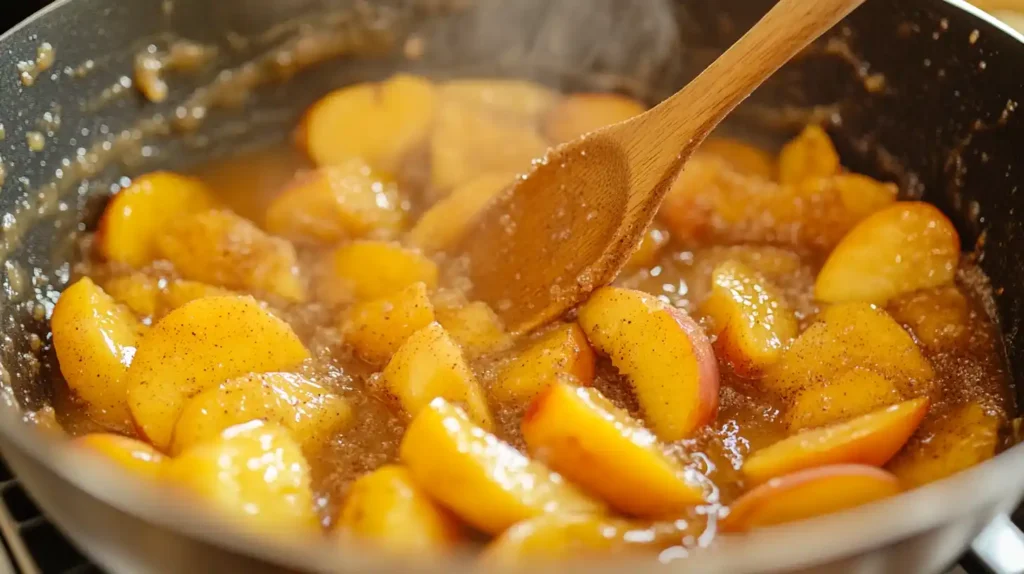
Step 2: Make the Peach Filling
In a large mixing bowl, combine the drained peaches, granulated sugar, brown sugar, cornstarch, cinnamon, nutmeg, vanilla extract, and lemon juice. Toss until the peaches are well coated.
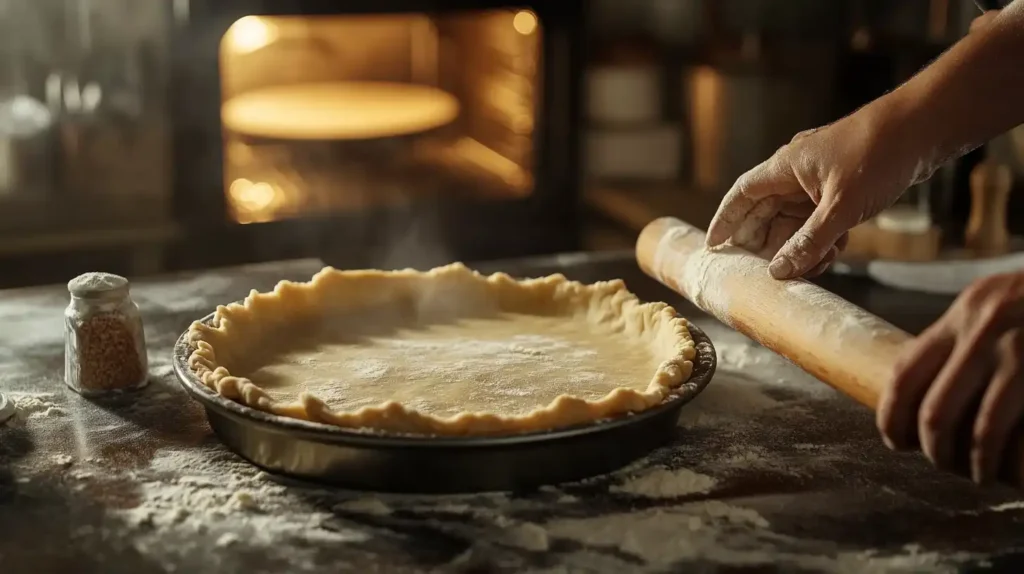
Step 3: Roll Out the Dough
Preheat the oven to 375°F (190°C). Roll out one dough disc on a floured surface and fit it into a 9-inch pie pan. Trim the edges.
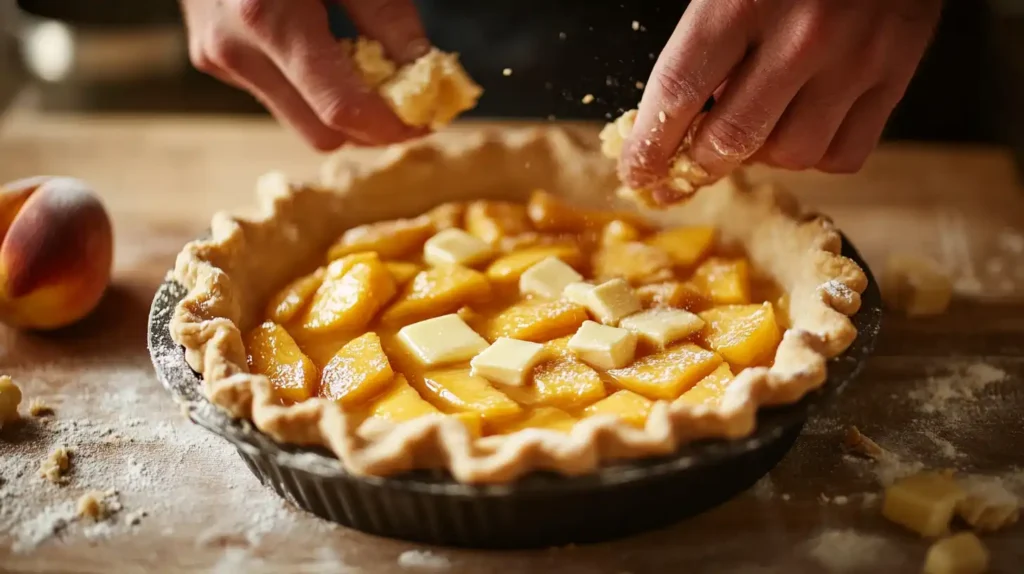
Step 4: Fill the Pie
Pour the peach mixture into the crust and spread evenly. Dot with small cubes of butter for a richer taste.

Step 5: Add the Top Crust
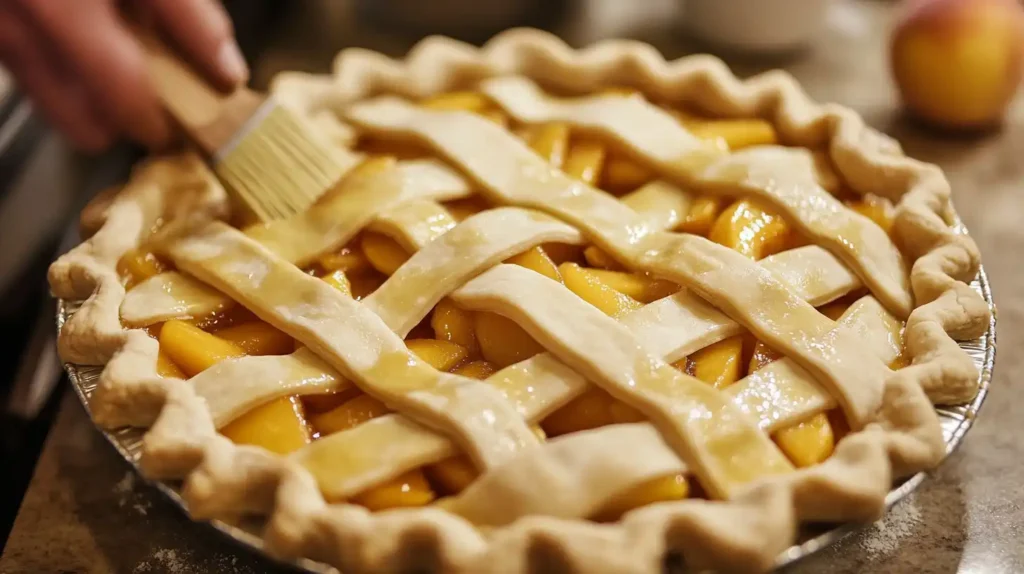
Roll out the second dough disc and place it over the filling. Trim and crimp the edges to seal. Cut small slits in the top for ventilation, or create a lattice design for a decorative touch.
Step 6: Brush and Bake
Brush the top crust with the beaten egg and sprinkle with coarse sugar if desired. Bake for 45-50 minutes, or until the crust is golden brown and the filling is bubbling.
By following these steps, you can create a canned peach pie that’s as beautiful as it is delicious.
Tips for Enhancing Your canned peach pie
While peach pie is delightful on its own, a few creative touches can elevate its appeal and flavor.
Adding Fresh Ingredients for Flavor Boost
Incorporating fresh ingredients can bring a new dimension to your pie. For instance, mixing in a handful of fresh peach slices adds texture and a burst of natural sweetness. A squeeze of lemon juice can balance the richness of the filling and brighten the overall flavor. Additionally, sprinkling chopped nuts, such as pecans or almonds, over the filling provides a pleasant crunch.
Creating a Decorative Crust
A decorative crust can transform a simple pie into a stunning centerpiece. Try weaving a lattice pattern for the top crust or using cookie cutters to create shapes like hearts or stars. Arrange these shapes over the filling for a playful design. Brushing the crust with an egg wash and sprinkling it with coarse sugar adds a golden, glossy finish and a slight crunch.
Serving Suggestions
For a perfect presentation, serve your canned peach pie warm with a scoop of vanilla ice cream or a dollop of freshly whipped cream. If you prefer a more indulgent touch, drizzle caramel sauce over each slice. For a lighter option, pair it with a side of fresh berries or a sprig of mint. No matter how you serve it, the pie is sure to delight your guests.
With these tips, you can take your canned peach pie from simple to sensational, making it a memorable treat for any occasion.
Common Mistakes to Avoid
Even with its simplicity, making a canned peach pie can come with a few pitfalls. By being aware of these common mistakes, you can ensure a perfect pie every time.
Overloading the Filling
While it may be tempting to add extra peaches for a generous filling, overloading the pie can lead to spillage during baking. Too much filling can also cause the crust to become soggy and compromise the texture. Stick to the recommended quantity for a well-balanced pie that bakes evenly.
Underbaking or Overbaking
Timing is critical when baking a pie. Underbaking leaves the filling runny and the crust undercooked, while overbaking can result in a dry filling and burnt edges. To avoid this, keep a close eye on your pie as it bakes. The filling should be bubbling, and the crust should turn a golden brown—this usually happens within 45 to 55 minutes at 375°F (190°C).
Neglecting Pie Crust Edges
The edges of the pie crust are prone to overbrowning or burning before the rest of the pie is done. To prevent this, cover the edges with foil or a pie crust shield during baking. Remove the cover for the last 10 to 15 minutes to allow even browning. This small step ensures a perfectly cooked crust from center to edge.
By steering clear of these common mistakes, you’ll be able to create a visually appealing and delicious canned peach pie every time.
Variations to Try with Canned Peach Pie
If you’re looking to put a unique twist on your canned peach pie, there are several creative variations to consider. These options add exciting flavors and textures while still celebrating the classic appeal of peaches.
Peach Crumble Pie
For a comforting and rustic variation, transform your pie into a peach crumble pie. Instead of a traditional top crust, prepare a crumbly topping using a mixture of butter, flour, sugar, and oats. Sprinkle it generously over the peach filling before baking. The result is a pie with a sweet, crunchy topping that pairs beautifully with the soft, juicy peaches.
Peach and Berry Combination
Adding berries to your canned peach pie introduces a delightful burst of color and flavor. Mix in fresh or frozen blueberries, raspberries, or blackberries with the canned peaches for a sweet and tangy filling.
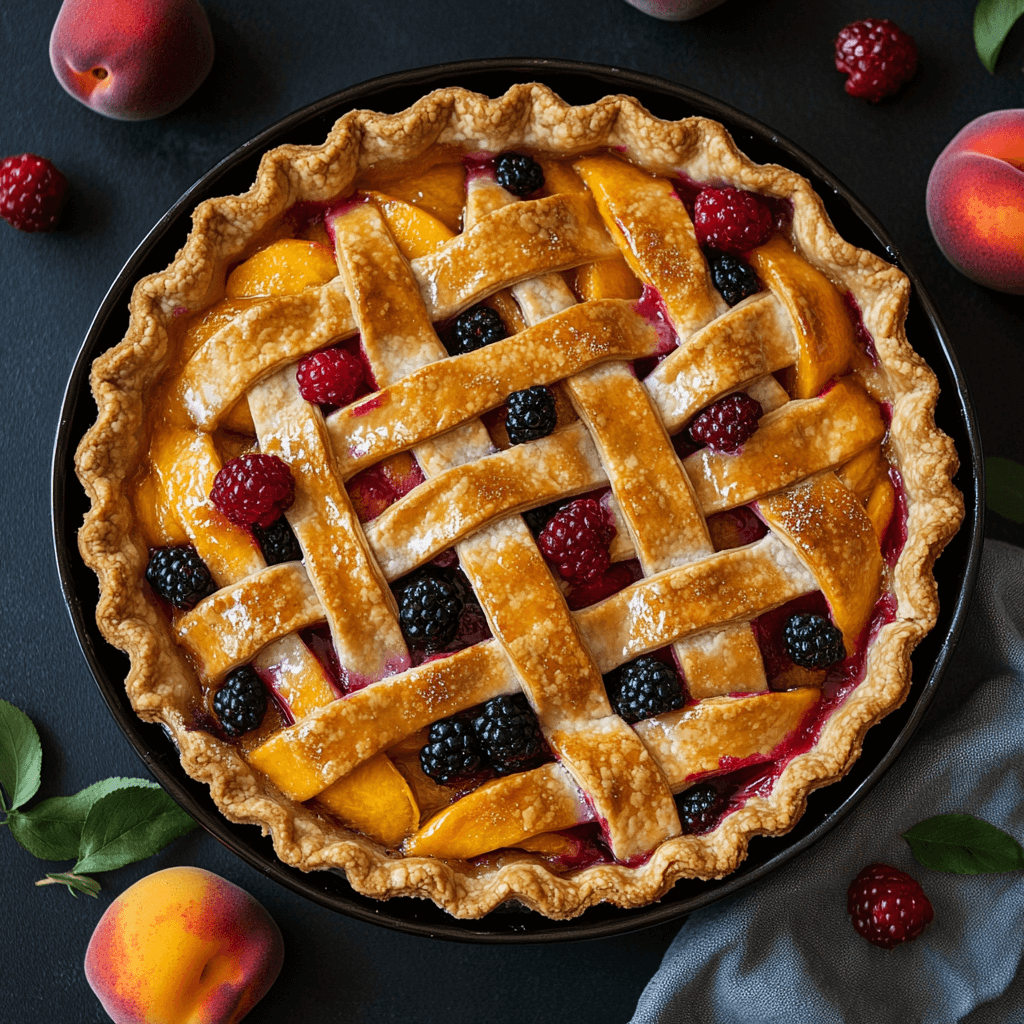
The combination of fruits creates a vibrant pie that’s perfect for summer gatherings or special occasions.
Spiced Peach Pie
Elevate your pie with a blend of warming spices for a cozy twist. In addition to cinnamon and nutmeg, try adding cloves, allspice, or even cardamom to the filling. These spices complement the sweetness of the peaches and create a pie that’s especially satisfying during cooler months.
Each of these variations offers a unique take on the classic canned peach pie, allowing you to experiment and find your personal favorite.
How to Store and Reheat Canned Peach Pie
Proper storage and reheating techniques are essential to keep your canned peach pie fresh and delicious. Follow these tips to enjoy your pie over several days or save it for later.
Refrigeration and Shelf Life
Once the pie has cooled completely, cover it tightly with plastic wrap or aluminum foil and store it in the refrigerator. A properly refrigerated peach pie can last for up to 4–5 days. If the pie contains dairy or egg-based ingredients, such as a custard filling, refrigeration is even more critical to prevent spoilage.
Freezing Tips for Longer Storage
For longer storage, you can freeze canned peach pie. First, allow the pie to cool completely to prevent condensation. Wrap it tightly in plastic wrap, followed by a layer of aluminum foil, to protect it from freezer burn. Label the pie with the date for reference, as it can be stored in the freezer for up to 3 months. When ready to use, thaw the pie overnight in the refrigerator before reheating.
Reheating for Best Results
To reheat the pie, preheat your oven to 350°F (175°C). Place the pie on a baking sheet and cover it loosely with foil to prevent the crust from overbrowning. Heat for 15–20 minutes, or until warmed through. For individual slices, you can use a microwave on a low power setting, but the oven ensures the crust stays crisp and flaky.
By following these storage and reheating methods, you can enjoy your canned peach pie at its best, whether fresh or saved for later.
FAQ
Can I use fresh peaches instead of canned peaches?
Yes, fresh peaches can be used in place of canned ones. However, you’ll need to peel, slice, and possibly add more sweetener to match the consistency and flavor of canned peaches.
Do I need to drain the canned peaches before using them?
Yes, it’s important to drain the canned peaches to avoid excess liquid.
What’s the best type of pie crust to use?
Both homemade and store-bought pie crusts work well.
How can I prevent the bottom crust from becoming soggy?
To avoid a soggy bottom crust, you can blind bake it for a few minutes before adding the filling.
Conclusion
Canned peach pie is a delightful dessert that brings together convenience, affordability, and delicious flavor. With minimal preparation and simple ingredients, it’s a perfect option for both novice and experienced bakers.
The versatility of canned peaches ensures that you can enjoy this treat year-round, while the endless variations and serving possibilities make it suitable for any occasion.
Whether you stick with the classic recipe or try one of the creative twists, canned peach pie is sure to satisfy. So why not give it a try? Gather your ingredients, follow the steps, and enjoy a homemade dessert that’s as easy as it is rewarding.